Sunday FamilyDinner
Turducken
|
Sunday FamilyDinner |
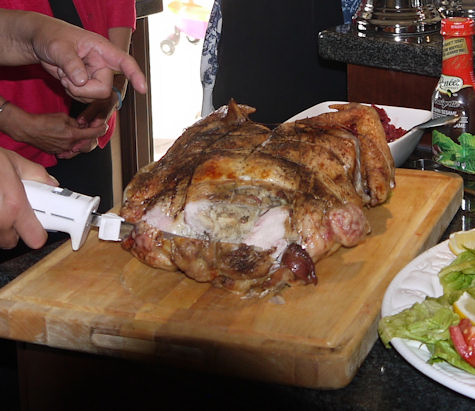
A slow roasted 17 pound (7.55 Kg) Turducken being sliced with an
electric knife
If you want to impress your family with a dinner item for Thanksgiving,
Easter, Christmas or whatever you are celebrating with a large number
of people - Turducken is the meat dish to be served. If you follow
the below recommended roasting instructions you will be guaranteed
a moist, tender and memorable delicious meal.
A Turducken is a turkey which is stuffed with a duck which is stuffed with a chicken with is stuffed with your best poultry stuffing.
There are complete instructions on how to debone the poultry and the duck but it is suggested that you find a competent butcher who is acquainted to doing this for you as it is messy and it is something that you would not want to make a mistake with especially for the first time serving. The butcher should provide you with a turducken ready to put into the oven that is brined ( you will have to asked the butcher to do this ) as long as you supply the butcher with enough dressing to fill the chicken cavity. The butcher should ask if you want the turducken to be legs on or off. The picture of the turducken at the top of this page does not have legs just wings.
To assure that you have the proper temperature in your oven, place an oven thermometer in your oven and using the oven baking temperature control adjust your oven temperature before you attempt to cook the turducken. This should be done as you preheat your oven prior to putting the turducken into the oven.
Also use a large oven roasting pan which allows some space around the outside of the raw turducken. If you do not, it might cause the turducken to burn where the roasting pan touches the turducken during roasting.
1. Low Temperature Cooking (recommended if you have time)
Make sure the raw turducken has an internal temperature of about 41 - 50 degress before starting to roast/Insert two roasting thermometers deep into the turducken. One at one end and one at the other.
Note that this is different from a turkey as there is no internal cavity. Both thermometers should read the same temperature at the beginning of the roasting time. However they may differ during the roasting process and the best way to know that the bird is completely roasted safely is that the lowest temperature read should be a minimum of 165 degrees F or higher.
Heat oven to 200°F.
Place the bird on a rack in a roaster and put it in an oven pan and set it in the centre of the oven and bake until internal temperature exceeds 165°F, up to 15 hours depending on size.
Cooking time: please calculate approx. 1.5 hrs per kilogram. e.g. a 5 kg Turducken would take up to 7.5 hrs.
Note: there’s no need to baste or cover with foil. If bird is not elevated on a rack, accumulated drippings will have to be removed from the pan every few hours so that the lower portion does not deep fry in the hot oil.
As you approach the end of the roasting the skin of the turkey will turn brown and be a little crispy.
2. High Temperature Cooking
Heat oven to 350°F.
Cut up a couple of carrots, onions and celery, put in an oven pan, place the Turducken on top of the veggies, add some red wine and water in a roaster and set it in the centre of the oven and bake until internal temperature exceeds 165°F.
The 11 – 22 pound (5 - 10 kg) Turducken cooks at 350°F for 4 – 7.5 hrs covered and 1 hour uncovered, breast down or until internal temperature exceeds 170°F.
Cooking time: please calculate approx. ¾ hours roasting time per kilogram. e.g. a 5 kg Turducken would take up to 4 hrs.
We recommend basting the Turducken during its roasting time every ½ hour to keep it nice and moist. Use its own drippings mixed with water and white wine. You can vary the degree or "hotness" in this recipe by addingmore or less cayenne pepper.
In both cases of preparation, allow the turducken to rest about 1 hour after roasting to allow the juices to infiltrate all the meat and make it tender and juicy.
Making Gravy
During the roasting process, when you remove the turducken to check the internal temperature, use a basting tool to remove some of the juices from the bottom of the roasting pan. These can be used as the basis of to make some delicious gravy put on top of the turducken and mashed potatoes.
Making proper gravy can be tricky but not impossible. It is best to have all the ingredients to hand, as time is of the essence.
The secret of a beautiful smooth gravy without lumps is in the stirring, which must be done continuously from start to finish. In any case, lumpy gravy can be resolved simply by straining the gravy to remove the lumps.
With a little practice, in no time at all you will be serving perfect gravy with your meals every time.
Gravy is a traditional accompaniment for a roast meat or poultry dinner but can also be served with other dishes such as chicken pies with mashed potatoes or even with just chips.
The best poultry gravies are made from the drippings and juices of the roasting poultry, which are then combined with a homemade stock, flour to thicken and herbs. The stock can be prepared on a previous occasion or during the roasting time but you will need at least an hour and a half to make it.
You can use other liquids instead of a homemade stock to make your gravy. Try adding wine, water with a stock cube, tinned chicken soup, milk or even a little cream.
For a delicious gravy you should season your poultry meat well before cooking.
As the meat slowly roasts, all the flavours from the spices and any other ingredients will flavour the meat and also flavour the drippings and fat, resulting in a rich and tasty gravy.
Add a few vegetables into the bottom of the roasting tin or even place them inside the body cavity of the bird if you are roasting chicken or turkey. You will achieve a flavoursome gravy by adding a chopped onion, a few cloves of garlic, tomatoes or celery. Do not forget to season the meat with salt, pepper and other herbs of your choice too.
Gravy can be made in the same roasting tin after removing the cooked bird or if you prefer in a separate saucepan and there are basically two different methods of making a gravy.
As a general rule, for every cup of gravy required, you should use 2 tablespoons of fat (drippings), 2 tablespoons of flour and 1 cup of liquid. For an extra thick gravy, you could use up to 3 tablespoons of both flour and fat to the one cup of liquid.
Experiment with ingredients and maybe you could even come up with your own gravy recipe to suit your tastes.
Back to Sunday Dinner Selections
If you have a Sunday Dinner recipe you
would like to share - e-mailPlease Visit
e-Mail ---- Additions, deletions or corrections
Copyright © 2011
tdc Marketing and Management Consultation